


Allgemeine Einbauanleitung/ Umbauanleitung für Epytec Tuning Bremssattel Adapter
General installation instructions/conversion instructions for Epytec tuning brake caliper adapter
Preparation:
Please note
What do you need for this?
- Depending on your technical knowledge, approx. 1-2 hours it
- Torque spanner with suitable attachments
- Liquid threadlocker
!!Important!!:
Please check the brake system in advance so that you can check whether your rim still fits. It must also be ensured that the brake calliper does not touch the rim spider. There must be at least 3 mm clearance from the rim spider to the brake calliper, otherwise a wheel spacer must be fitted.

Remove the old brake system:
Jack up the car or use a lift
To remove the old brake system, the car must be jacked up or, ideally, you have a lift available.

Remove the rim
Now you can get started, first of all you need to remove the rim. You will need a wheel cross or spanner for this. Firstly, loosen all the wheel nuts and then remove the wheel and rim.

Remove the original brake system
Once the rim has been removed and the brake system is free, it can be released.
To do this, the bolts behind the axle must be removed. Example image, this may vary depending on the brake caliper type and car.

Use a screwdriver to loosen the brake line at the retaining clip.
Once everything has been loosened, simply leave the brake caliper on the old brake line so that the brake fluid does not leak out

Then you can simply pull the brake calliper off the brake disc.
If the brake caliper is a little tighter, simply use a large slotted screwdriver to help you,
with this you can simply push between the brake calliper and brake disc and then push the brake calliper away from the brake disc with minimal effort.

Remove the old brake disc and heat protection plate
As soon as the brake disc is freely accessible, you can loosen the fastening screws and remove the brake disc from the wheel hub.

Now you can remove the heat protection plate by removing the fastening screws (see red markings, may vary depending on the car).
Then you can simply pull it down over the wheel hub. If the screws are stuck, we recommend spraying the screws with rust remover to make them easier to loosen.

Remove any dirt and rust from the wheel hub and mounting points on the axle
Now you should clean the wheel hub and the mounting points of the adapter on the axle using an angle grinder with a wire brush attachment, for example, so that you have a clean and flat contact surface and an optimum fit for the adapter. If you don't have an angle grinder, you can also use a conventional wire brush.

Adjust wear indicator, if available
If you do not have a sensor for the wear indicator, you can skip this point. To do this, lever out the wear indicator sensor on the original brake caliper and from the brake pad holder using a flat-blade screwdriver.

Next, remove the wear indicator plug. The best way to do this is to use a flat-blade screwdriver to carefully prise open the plug connection.

Bend the wear indicator bracket upwards and to the side
If you do not have a sensor for the wear indicator, you can skip this point.
In order to fit the Epytec Tuning L adapter, the bracket for the wear indicator must be bent upwards. Depending on the model, this may only be on one side of the axle or your car may not have a wear indicator at all.
It is best to use a pipe wrench and carefully bend the bracket so that there is enough space upwards and to the s


Reconnecting the wear indicator to the car
If you do not have a sensor for the wear indicator, you can skip this point.
As soon as the bracket for the wear indicator is bent upwards and to the side, the cable can be reinserted into the guide bracket

First, tie the wear indicator together so that it takes up little space.
The easiest way to do this is to turn the wear indicator 180° and pull a hose over it.
This way, the wear indicator remains protected and original and can be reused if necessary if you retrofit the brake system.

You can then clip the locking indicator back into the curved bracket on the vehicle.
This means you still have everything you need if you need to retrofit it again

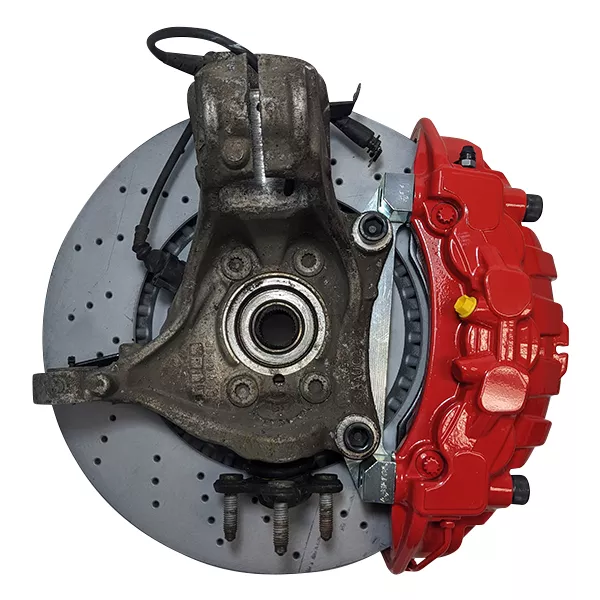
Fitting the new brake system
Fitting the Epytec Tuning L-adapter
Now you can fit the centring ring for the brake disc onto the wheel hub so that the brake disc is optimally centred on the wheel hub and you have no movement.
If your L-holder adapter set does not include a centring ring, you can skip this point

!!Important!!
- Check the parallelism of the axle mounting points to the brake disc.
- The best way to do this is as follows. It is best to place a bracket or a 100% straight plate on the mounting points and measure the distance to the brake disc on both sides.
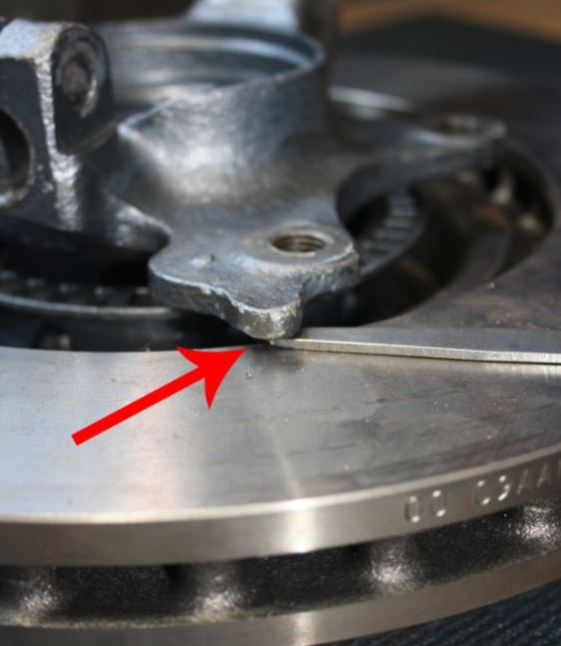

In our example, the difference is 1 mm, so we compensate for this by using a suitable spacer disc on one side.
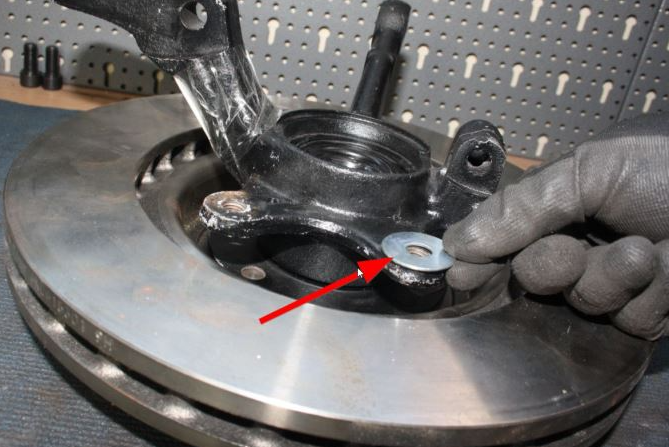
!!Note!!
Unfortunately, this is the case with many cars, as the axle carriers are made of cast iron and also warp over the years or wear out due to rust. As a rule of thumb, the older the car, the more extreme the deviations, which is why each steering knuckle should be checked separately. It may be that it fits on one side and on the other side there is extreme misalignment.
!!Important!!
Due to the manufacturing tolerances of the manufacturers, the brake calliper mount is often not parallel or has tolerances. Even with original parts, we have been able to measure differences of 1-2 mm on cast steering knuckles. The dimensions can also deviate after wheel hub conversions and wheel bearing replacements. If this is the case, it is essential to use appropriate shim discs to compensate for these vehicle tolerances.
Here you find the matching shim discs (click here)
Once the parallelism of the axle mounting points has been checked, the L-Tuning adapter can be bolted to the axle mount using the high-strength bolts supplied.
Important!

The engraving must point towards the engine compartment, then you know that the tuning adapter is installed correctly.
This also has the advantage that the engraving is easy to read from the inside (below the car) for the TÜV inspector and it is not covered by the brake disc.

Install the brake disc
As soon as the Epytec Tuning L adapters are mounted, you can mount the brake disc on the wheel hub.
In our case, we directly used an assembly aid, which made the entire assembly process much easier. The assembly aid is required because otherwise the brake disc will not hold until the 6-piston Porsche Panamera brake caliper is installed. With our brake system kits we supply the appropriate installation aid.
Otherwise you can find the appropriate ones here:
Click here for the assembly aid in in M14x1.5 (click here)
Click here for the assembly aid in M12x1.5 (click here)

Grease brake pads / brake calipers with brake paste
!! Important!!
No grease must be applied to the direct brake pads, only to the top of the guide (blue arrow) brake pads. Likewise, no grease should be applied to the brake disc or piston, but only to the guide pins of the brake calliper (blue arrow)
- Reduces squealing noises
- Prevents corrosion
- Improved braking performance (brake pads have less friction and slide more evenly on the brake caliper)
- By preventing corrosion, brake pad replacement is much easier and quicker


Fitting the pads and retaining clips in the brake caliper

If the pistons are still sticking out a little, they can simply be pushed inwards by hand, as the brake calipers are still empty and not yet attached to the hydraulics :)


As soon as the retaining clips are inserted, you can simply fix the brake pads using the guide bolts and retaining clips.
May differ from the example image depending on the brake caliper.


!! Important!!
the bleed nipple of the brake system must point upwards during installation

Check the brake disc for free movement and steering angle
As soon as the brake caliper has been fitted to the new brake disc, you can check the brake disc for free movement and steering angle and that nothing is rubbing when the steering wheel is fully turned.
The best way to do this is to turn the disc completely to the left and right to check whether there is anything in the way,such as suspension joint, wishbone and others
Remove the old brake line and brake caliper
Now you can completely remove the old brake caliper and the old brake hose.
The old brake hose is only removed if you have a new steel flex hose to replace it, otherwise this point can be skipped.
To remove the brake hose, first carefully loosen the retaining clip on the vehicle side and remove it from the guide bracket behind the brake disc.
The brake hose can then be removed from the old brake caliper and the brake caliper finally dismantled.

Fitting the steel flex line (if ordered)
- No pressure loss when the brakes are applied, noticeably more precise pressure point
- No swelling as with rubber lines
- Cost savings, as steel flex lines have an almost unlimited service life and do not have to be replaced every 3-5 years
- Shorter braking distance
- Marten protection
- Including parts certificate
- Great look

Then clamp it back into the guide holder

and attach to the brake caliper. For easier attachment, we have manufactured the steel flex line with the corresponding connection to prevent the line from kinking.

Bleeding the brake system
Once the steel flex lines and the brake system have been refitted, the brake system must be bled. This means that all the air must be removed from the brake system and the brake calipers filled with brake fluid.
It is best to work in pairs and proceed as follows:
Check the brake fluid
- Make sure there is enough brake fluid in the expansion tank

Bleeding
- open the sealing cap

- Attach a hose (preferably transparent, so you can see it better) to the bleeder valve and place the end in a container of brake fluid
- Then open the bleeder valve slightly
- now press the brake pedal slowly to the floor and hold it there close the bleeder valve again
- The brake pedal can now be released

This process must be repeated until no more air bubbles can be seen in the hose and the brake fluid runs evenly.
!!Important!!
Make sure that you keep checking the expansion reservoir to ensure that there is still enough brake fluid in it so that no new air is drawn in and re-enters the system.

Cleaning the brake disc and brake caliper
After bleeding, it is important that the brake disc and brake calipers are cleaned of any brake fluid residue, as the brake fluid is corrosive and could corrode the brake calipers and brake discs.

Check the free movement of the rim and brake caliper

!!Important!!
Please check whether you have enough space between the wheel centre and the brake system. If this is not the case, a wheel spacer must be fitted to ensure free movement.
There must be at least 3 mm free movement from the wheel centre to the brake caliper, otherwise a wheel spacer must be fitted.
